
Showing posts with label BBA. Show all posts

3/6/13

16 Chewy Bagels ~ You Have to Make These!!


Let me introduce this lovely, chewy water bagel that rival the ones from your local bakery. Bakeries often "steam-bake" their bagels, making them light and chewy, but often lack in flavor that these boiled bagels can give you.


I made bagels many, many years ago and swore I would never bake them again.  They were too time consuming; had too many steps.  I was pleasantly surprised at how easy and simple these were to make!

It begins with a batter-like sponge of yeast, bread flour and water.  I don't have bread flour, so I used 1 Tablespoon of vital wheat gluten plus enough all purpose flour to equal 4 cups.

After 1-2 hours, it is a bubbly mass.

Add more yeast...


more high gluten (bread flour or APF with vital wheat gluten), salt and malt powder.

What is malt powder?   It is a derivative of roasted barley.  It converts the dough starches into sugar, promotes a strong rise, gives it great texture and that beautiful brown crust.  You can find malt powder and syrup at Kingarthurflour.com.  Only  2 teaspoons are needed for this recipe, and the rest can be stored in your freezer.  Do not confuse malt powder with the malted milk powder that you use for shakes, etc.  It is not the same thing!


If you don't have this powder, you can use honey, brown sugar or malt syrup.

O.k., for those of you who have the Classic 4.5 qt. 250 watt Kitchen Aid mixer, DO NOT USE it for this recipe.  You will kill (burn out) your mixer with this very stiff dough. I recommend an electric mixer that is at least 450 watts or higher.  Oh, and yes, a Bosch mixer will work!

Knead by hand or use a mixer till you have a smooth, pliable dough.


The original recipe suggests weighing the dough into 4.5 oz. portions, which make 12 VERY LARGE COSTCO SIZED bagels.  I prefer to make the 2.25 oz size, which makes 24 perfect mini bagels for sandwiches, mini pizzas, etc.


Each portion is rolled into a ball, with the ends tucked neatly underneath....


After a 10 minute rest, I poke a hole in the middle...
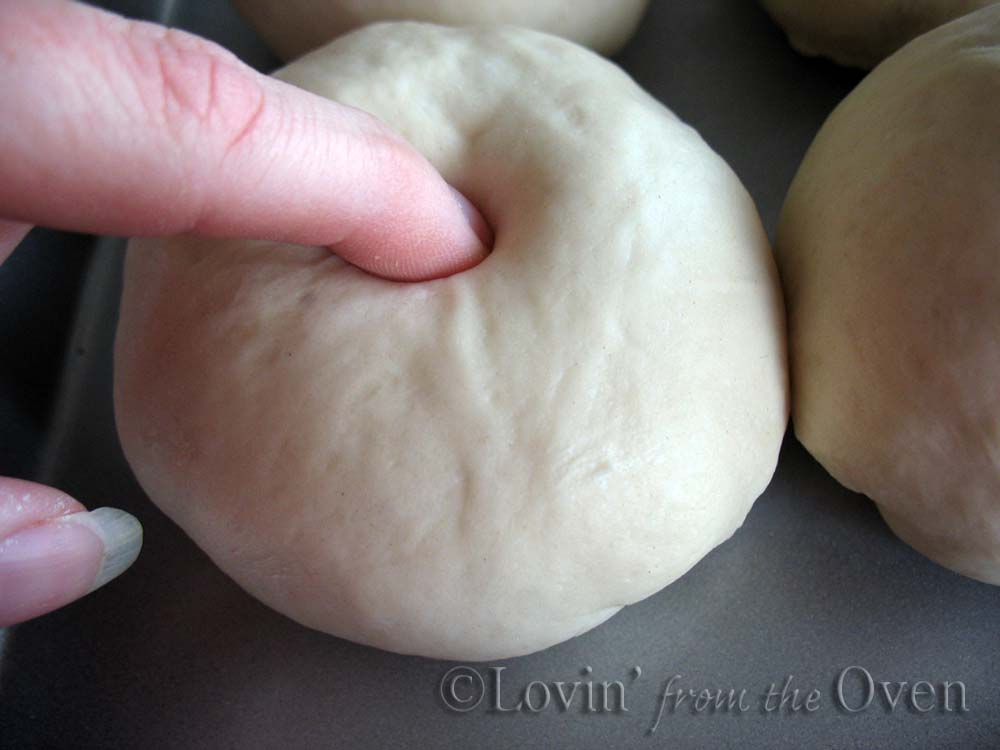


Move over, Pillsbury Dough Boy...

And stretch it out with my fingers until I get a 1-2" sized hole.

The shaped bagels are covered with plastic wrap for another 10 minute rest.


This part is new to me.  After 10 minutes, you give one bagel the "float test."  Why do the float test?  It will let you know exactly when to put the bagels into the fridge to slow down the rising process.  If you wait too long, your bagels may rise too much and deflate during baking.


Drop the bagel into a bowl of room temperature water.  If it floats, it's ready to go into the fridge. If not, wait another 5-10 minutes and test the bagel again. 

This floated immediately.  It floats, it floats!!

Bagels are covered with plastic wrap and put into the fridge for up to 2 days. Make sure no air can get into the plastic wrap or your bagels will develop a "crust" where the air comes in contact.


Set it and forget it, awriiiiiight!

When you are ready to bake, set your oven, and get a large pot of water ready.

Add baking 1 T. soda to your water.  This is one of the secrets to a chewy crust!


These are boiled for 30 seconds to 1 minute on each side...


and immediately dunked into toppings of your choice.

My boys love the EVERYTHING topping.  This is equal parts of sesame seed, coarse salt, dried garlic, dried onion and poppy seed. I found the garlic and onion at Winco. Hooray for bulk spices!

Tip:  I couldn't bring myself to pay $5 for 1 oz. of sesame seeds.  I spoke to my local baker and he sold me 2 oz. for .60 cents!  


Immediately bake the bagels for 5 minutes at 500 degrees, rotate pans, drop the temperature to 450 degrees and bake for another 5 minutes.


Cool on a wire rack for 15 minutes, and they are ready to eat!!!!


My favorite?

The Asiago cheese topped bagels....


The verdict?

A soft, dense, chewy bagel that is worthy of cream cheese, jam, or your favorite sandwich fillings ~

I will be making these again.


And again.

Bagel Recipe
(full page printable recipe)


3/9/11

1 BBA: 100% Sourdough Rye


I really, really didn't want to make this bread.

But I made it anyway.

Why?  Because my mom gave me this:


Caraway seeds.

My mom and dad began talking about their fond memories of rye bread, especially pumpernickel rye, (which is two more breads after this one) and I caved, promising to make this bread, if.....if they would be my "guinea pig" taste testers.

This is a three day bread, not to be confused with spending ALL three days slaving over this bread. 

Day one was a firm rye starter (sourdough starter, rye flour and water) ...


and soaker of coarse rye plus water.

Day two brought the dough together.  It totally felt like a sticky wet clay.  How to handle sticky dough?  Wet your hands.  Almost makes you feel like you need to break out the potter's wheel and mold something useful, like a vase or ....  something.  I managed to shape these into loaves, knowing that they would spreeeaaaaad out and needed some structure.

I put them into the fridge over night and here's what I woke up to:


Yup.  They did spread out.  Good thing I put 'em in loaf pans!

I half-heartedly scored the tops and baked them in a hot oven with steam.

The result?  Not surprisingly, they barely rose.  At first glance, you would think this was a banana bread, right? 

Turning the bread out onto the cooling rack, I heard the long ago familiar THUNK of a 5 pound "brick" of my very first loaf of wheat bread....


My son couldn't wait to try this bread.  He could smell it into the next room.  After the mandatory one hour cooling period, I sliced into the bread for the obligatory crumb shot, which by the way, is very dense...


I handed a slice to my son, who slathered it with butter.

He took a bite and slowly chewed it.  He glanced over at me.

"Do you like it?" I asked.

He paused.

"Would you be offended if I threw it away?"

"Nope."  And into the trashcan the slice went...


The rest of the bread went to my mom and dad's.  Their verdict? 


They LOVED it.  Go figure.


Image and video hosting by TinyPic

2/21/11

4 New York Deli Rye Sourdough


This is bread 31 of the 41 breads listed in the Bread Baker's Apprentice challenge.  Even though this challenge is almost 2 years old, some folks have successfully completed it in one year.  Fortunately,  Chris from A Ku Indeed has started another challenge group for this year.  Take a peek at the BBA Facebook page.  If you have ever wanted to learn all about the basics of making bread, come join the group!  It's never too late and you can go at your pace.  All you need is a love for bread and the book, The Bread Baker's Apprentice.

I'm not a fan of rye bread, so I approached this challenge half hearted-ly.  I do know that my father and hubby love rye bread, especially pastrami on rye, so I made this bread for them.  I halved this recipe to make (2) 1 pound free standing loaves.

This bread begins with a rye sponge starter: starter, rye white rye flour, water, and onions are mixed together.  What?!?  Onions?  I'm not a fan of fruit in my breads, let alone chunks of onions. 

I ground my rye kernels in my electric wheat grinder and sifted them to make "white" rye flour.  What is left behind is the bran, or outer husk of the kernels, which is not used in this recipe.


Combined all the ingredients required for the sponge starter (sans onions).  Here it is, four hours later, bubbling happily. 

I put this into the fridge overnight.  The next day, the rye starter is taken out for one hour to remove the chill.  While it is warming up, I check on other BBA posts on this bread and decided to add the onions, a "must have" for this bread.  One large onion is chopped and sauteed in oil till translucent.  Hey, I don't want crunchy onions in this bread!

Flours, brown sugar, salt, yeast are put together...caraway seeds are optional. 
Add the starter, shortening and buttermilk.  I like to use butter milk powder (4T. + 1 c. water).
I threw in the onions, mixed it till everything came together into a soft, not sticky mass...let it sit for 5 minutes so the gluten can begin to develop.
It is really, really hard to tell if this is ready....the chunks of onions are getting in the way of being able to tell if this dough is "smooth" and ready.  Also, Peter Reinhart recommends completing the kneading in 6 minutes or less....over-kneading can cause this bread to become "gummy."  The dough is put into a lightly greased container, covered, and allowed to rise till double in size, around 90 minutes.

I divided the dough into 2 piles and shaped them into batards.  An egg wash was brushed onto the fullen risen loaves...


Slashed with a sharp tomato knife...I think the slashing de-flated my loaves a little... you can see the over-proofing of the side of my left loaf, which looks like a big, ugly stretch mark....

and put into a hot oven for 10 minutes, rotated 180° and baked for an additional 10 minutes.


The loaves are golden brown all over and make a hollow sound when thumped on the bottom.  They cool for the mandatory one hour on a rack.  If you cut into it right away, your centers will not be fully cooked. 

An hour has passed.  Let's take a look at the inside:


A nice, tight crumb, with a crispy crust.  I pick up a slice and closely inspect it for the onions.  I could not SEE any....looked at another slice.  Couldn't see any there, either.  The only onions visible were outside on the crust.  I take a bite.

I was surprised.  It didn't taste too bad.  I could detect a slight taste of onions, which complemented the bread nicely.  I have to say that this bread, for me, will be an "acquired taste."

My father and hubby loved the bread.  My father wants the next one to have caraway seeds; in fact my mom gave me some for my next rye bread...

As a pastrami sandwich, they loved it even more!


Next time, I will make this in a loaf pan for sandwiches.

1/12/11

5 BBA Sourdough Bread!

There are 43 breads in the Bread Baker's Apprentice, written by Peter Reinhart.  Almost, ahem, two years ago, Nicole from Pinch My Salt created the BBA Challenge in which a group of people were invited to purchase the book and bake a loaf of bread from it each week.


A few people have finished the challenge and others (like me) are still plugging along.  Through our successes and yes, failures, we each have shared and learned so much about the basics of making, shaping, and baking bread.

Sourdough is the 30th bread in this challenge.  While most people have opted to make these breads in the listed order, others have opted to skip around, making breads that appeal to them.  Some, (like me) have skipped the breads that call for fruit:  Christopsomos, Lambropsomo, Panettone, and Stollen.

The group is still going and members can join anytime.  All you need is the book and a love of bread.  There is comfort in knowing others have gone on before me and can call on them via email, Twitter (#bbac), or FaceBook for questions and answers!

My humble starter is now a 1 1/2 months old.  Still a baby, but it has produced what I would call a successful loaf of bread!

I took my 1:1:1 starter and added unbleached all purpose flour and distilled water according to P. Reinhart's Basic Sourdough recipe and mixed it up.  It was a really thick, sticky mass.


I put it into a lightly oiled Ziploc container with a piece of tape and a line to mark the original level.     My kitchen is a little cold, so I put it in the oven with the light on.  Whoops ~ I think it has more than doubled!


This now goes into the fridge over night.  The next day, about 4 hours before you plan to make the bread, it is taken out.  The dough slides out easily.


The dough is then cut into about 8-10 pieces, sprayed with a mist of oil, and covered for an hour, to take off the chill.  I can't believe how sticky it is!


To make the dough, the starter pieces, water and flour are added along with salt until the dough is the consistency of french bread.  French bread?  I made that over a year ago....I can't remember what the consistency was like!  Oh well.  Firm, tacky, but not sticky.


The dough is covered and put to rest for about four hours.  I divided it into two pieces, shaped one into a batard, and the other into a boule, or a ball.

I ordered these bannetons from CSN Stores.  I'm an online shopping newbie and was a little confused with the checkout process, so I called their 1-800 number.  I spoke to a real live person, who helped me tremendously.  She was so nice and did my order over the phone.  Less than two weeks later, my bannetons arrived!


I was thrilled!  Bannetons are not neccessary in making these breads, but they leave a pretty design.  You can always improvise by misting a stainless steel or glass bowl with spray oil, lining it with a cloth napkin (no terry cloth!), misting it with oil and lightly dusting it with flour.

The dough is put seam side up in the bannetons, tops are misted with oil and covered with plastic.  I put the entire banneton inside a plastic bread bag and set them in my garage overnight to proof, as it was at least 40 degrees or colder.  I wanted a more sour taste and an overnight proofing in the basket would do the job.

Four hours prior to baking, the dough filled bannetons are brought into the house to warm up.

The oven is readied with a baking stone, temperature at 500°F, and an old 9x13 baking pan in the bottom to hold water for steam.

Ten minutes before baking, the dough is turned out onto a peel.  I think I had a little too much flour, but that's okay!


The dough is scored, put directly onto the hot stone in the oven with a cup of hot water poured into the pan in the bottom of the oven for steam.  After 30 seconds, the dough is spritzed with water from a spray bottle.  This process of spritzing is repeated two more times with 30 second intervals.  The oven temperature is brought down to 450°F and the loaf is cooked for 20 minutes.


Not too bad, huh?  Kind of looks like a sand dollar, doesn't it?  The bread needs to cool for at least 45 minutes, otherwise, the crumb will be a little gummy.  Gotta wait!

Tentatively, I cut open the end...I am pleasantly surprised!


There are many irregular holes, which look so great!  O.k.  Now I need to taste it.

Crispy exterior, soft, creamy interior, with just a little chew....oh...there are the sourdough notes!  I could definitely taste the sourdough, though there is not the bite that a San Francisco sourdough has.  This is good enough for me!  This is a bread that I will definitely make again!


10/29/10

8 Italian Bread Bowls


Recently, I made Peter Reinhart's Italian Bread into soup bowls.  This has been my all time favorite bread as part of the BBA challenge.

My husband firmly believes soup needs to be in a bread bowl in order for it to be a "meal."


Take your favorite bread recipe and divide them into 6 oz. portions.  This Italian Bread recipe easily makes six bread bowls.  This was the perfect size for a ladies function.

Gently shape each portion into a ball, stretching the outside and tucking the edges underneath.  Let the dough rest for 5-10 minutes.  The dough will relax and the pinched part of the bottom will come apart.  Bring the edges of the dough together again.  This is creating surface tension.
 Surface tension allows your dough to rise up instead of out.

After the dough has risen, it is slashed (I use a tomato knife) and put into a hot 500ºF oven.  To create a crispy, artisan bread crust, take a spray bottle filled with water and quickly mist the area over the dough (don't mist any light bulbs or glass!)  Shut the oven door; wait 30 seconds, and quickly mist again.  Close the oven door, wait 30 seconds and mist one last time.  Close the oven door.
Turn the temperature down to 400ºF  and cooked them for 20-25 minutes, creating a thicker crust to hold the soup.


The result?

They were perfect.  The right size, texture and flavor.


Twelve of these bowls were quickly enjoyed with soup by several ladies at a church function.


Related Posts Plugin for WordPress, Blogger...
Pin It button on image hover