Showing posts with label Freezer. Show all posts

10/29/20

3 EASY Pumpkin Butter!

Enjoy this spreadable pumpkin butter that is slightly sweet, perfectly spiced, and ideal on a cracker, toast, or stirred into your favorite yogurt. If you like pumpkin pie, you'll love this delightful treat that can be enjoyed any time! Put this lovely pumpkin butter in a cute decorative jar and it will be a memorable gift for someone you love. 

I got these jars from IKEA, but you can also find these 8oz darling jars here. 

You can use a canned pumpkin, or better yet, make your own pumpkin puree with a pie or Sugar pumpkin. It's incredibly easy to make! 

Can't find a Sugar Pie pumpkin? You can use sweet potatoes or butternut squash instead.


I have been making pumpkin puree in my pressure cooker for several years. You can find my recipe & video here.  It is so easy and tastes better, in my opinion. 

You can use your slow cooker, microwave or stove top to cook your pumpkin butter until it resembles a very thick applesauce. How long depends on how watery or thick your pumpkin puree is. You can find directions for all three methods in the recipe below. 


The ingredients are very simple: pumpkin puree, apple cider, brown sugar, vanilla extract & spices. You can adjust the sugars or  spices to your liking or even use your favorite pumpkin spice. 

The mixture will bubble & pop like a lava pot - to prevent it from escaping out of the pot, you'll want to stir it often, and use a splatter screen shield or a sheet of paper towel over the pot.


The mixture will continue to thicken, caramelize and smell so good! Who needs a candle, right?


How do you know when it's thick enough? 

Use the Cold Plate Test: Put a small plate in your freezer. When it is chilled, put a small dollop of pumpkin butter on the chilled plate. Use your spoon to run a line through the middle of the dollop. If the line remains and doesn't fill the gap, your butter is ready. 


Transfer your butter into storage containers. If you want to freeze the pumpkin butter, you will want to use freezer safe containers and leave some room (head space) for expansion. 

Unlike my Apple Butter or Vanilla Spice Pear Butter, you cannot water bath can or pressure can pumpkin butter. Why? Pumpkin butter is not only a low acid food, it is too dense for it to be safely pressure canned. (Source) You can freeze your pumpkin butter for up to a year.


Uses for Pumpkin Butter

  • spread on toast, crackers
  • add to yogurt
  • top ice cream
  • add to a vanilla shake
  • cake filling
  • pancakes, waffles
  • cinnamon roll filling
  • dip for apples
  • bagel with cream cheese, and much, much more!


Easy Homemade Pumpkin Butter

Easy Homemade Pumpkin Butter

Yield: 5 cups
Author: Frieda Franchina
Prep time: 5 min
Cook time: 30 min
Total time: 35 min
This Pumpkin Butter is a wonderful spread for toast, muffins, or added to yogurt, ice cream or a shake. It makes a great gift for anyone who loves pumpkin pie. I used my electric pressure cooker using the saute setting, but you can find stove top, slow cooker & microwave directions below.

Ingredients:

  • 3.5 cups fresh pumpkin puree -OR- 29 oz can 
  • 1 1/2 cups apple juice or apple cider
  • 1 cup (7.5 oz) light brown sugar
  • 2 teaspoons ground cinnamon
  • 1 teaspoon ground cloves
  • 1/2 teaspoon ground ginger
  • 1/4 teaspoon ground nutmeg
  • 1/2 teaspoon pure vanilla extract

Instructions:

How to Make Easy Homemade Pumpkin Butter

  1. In a medium (3quart) saucepan, combine pumpkin, apple cider, brown sugar and spices, stirring well.
  2. Bring mixture to a boil over medium high heat; reduce to low & simmer, stirring frequently to prevent splatter. Cover pot with a paper towel or splatter screen.
  3. Cook until thickened, about 30 minutes. Put a dollop on a chilled plate, running a spoon through the middle. If the line remains & doesn't fill the gap, your butter is ready.
  4. Add vanilla extract, stirring well.
  5. Transfer butter to storage containers & cool for about 30 minutes.
    Cover & store in the fridge for 2-3 weeks.
    If freezing your butter, allow 1/2" head space, cover & freeze for 6-12 months.
Pressure Cooker: Add all the ingredients to the inner pot (except for vanilla). Select the saute or browning setting, using the *lowest* setting possible. Cook until thickened, stirring often to prevent bubbling. Follow steps 3-5 above.                                                                                                            
Slow Cooker: Add all ingredients (except for vanilla) to insert, cover with paper towel, then lid. Use LOW for 3-4 hours, stirring occasionally. Follow steps 3-5 above. 
Microwave: use a large 3quart glass bowl, cover with a paper towel, High power 6 min, stir, High power 6 min, stir, High power 3 minutes, stir, let cool. Follow steps 3-5 above. 


3/17/20

0 No Fail Steel Cut Oats - Instant Pot


Cooked oatmeal has never been easier to make, thanks to using my pressure cooker! I simply stir steel cut oats, water, & salt into the pot, put the lid on and set the delay timer for it to be hot & ready, first thing in the morning!

My husband loves a bowl of creamy, chewy oatmeal, with cinnamon, maple syrups and a splash of milk. The problem? He gets up at 4 A.M. Me? No way. I wanted to surprise him by making this oatmeal using the Delay setting, and when I woke up at 8 A.M., I had hot oatmeal (thanks to the Keep Warm setting) and a note from my hubby, "WOW! That was delicious! I love you!"

Smiling, I knew this recipe would be a keeper, I hope you enjoy it too.

What are steel cut oats?
Steel cut oats are a great pantry staple. These are oat grains, cut into smaller pieces with a steel mill. Steel cut oats are also known as Irish oats, coarse oats, or pinhead oats. Steel cut oats are an excellent source of protein, have slightly fewer calories, lower glycemic index, more fiber, and are equivalent to rolled oats in protein, carbs & fat content. I use regular steel cut oats (not quick cooking) for this recipe.

Cook Times
Steel cut oats can take as long as 20-30 minutes to cook on the stove, stirring occasionally, to become tender enough to eat.  When cooking steel cut oats with a pressure cooker, the cook time is only 4 minutes, but uses a full natural release (about 20 min), so the overall "cook" time is 35 minutes.

The advantages to using a pressure cooker are no hands on stirring, and you can use the Delay Start setting to enjoy hot oatmeal the next morning. How? It depends on the cooker you have. I wanted the oatmeal to be ready by 4 A.M., right? The overall cook time is 35 minutes, so I set my cooker to START the process at 3:25 A.M. If it's 10 P.M. right now, I'd set the Delay Start for 5 hours, 25 minutes.

Shelf Life
Dry steel cut oats have shelf life of 1-2 years in an airtight container.
Cooked oats will keep in the fridge for 5-7 days, and up to 3 months in the freezer.


I like to make individual Oatmeal "cups" by using an ice cream scoop and scooping cooked oatmeal into these silicone muffin cups. You can use muffin tin, if desired. Once frozen, transfer them to a freezer baggie for up to 3 months,
Put the frozen oatmeal into a microwave safe dish and warm it on Hight for 2-3 minutes, add your favorite toppings and enjoy.

Pressure Cooking Steel Cut Oats
Oats & other grains can foam during cooking, so it is important that your do not fill your cooker more than half full. If using a smaller, 3 quart pressure cooker, cut this recipe in half. If using a larger, 8 quart pressure cooker, increase the cook time by three minutes.

Toppings & Add-Ins
You can add a variety of fruits, nuts, spices, milks, etc. to your hot, cooked oatmeal. Let this list inspire you to create your favorite morning oatmeal or even have an Oatmeal Bar with these toppings at your next brunch gathering:
  • Fresh fruit - chopped apples, bananas, mango, peaches, etc.
  • Berries - raspberries, strawberries, blueberries, blackberries, etc.
  • Dried fruits
  • Jams
  • Nuts
  • Chocolate chips
  • Coconut
  • Nut butters - almond, peanut or cookie butter
  • Caramel
  • Brown sugar
  • Maple syrup
  • Honey
  • Cinnamon, nutmeg, vanilla extract
  • Hot chocolate mix
  • Yogurt, milk
  • Protein powder


print recipe

Steel Cut Oats - Pressure Cook
This is a great recipe to prepare the night before, using the Delay setting of your pressure cooker and have it ready first thing in the morning! Oats and other grains can foam during cooking, so it is important that you do not fill your cooker more than half full. If using a 3 quart cooker, cut this recipe in half. If using a larger, 8 quart cooker, increase the cook time to 7 minutes.
Ingredients
  • 2 cups steel cut oats
  • 5 cups water
  • 1/4 teaspoon salt
Instructions
1. Combine oats, water into insert and stir.2. Close the cooker and close the pressure valve.3. Select High pressure and the timer for 4 minutes.4. When cooking cycle is complete, allow the cooker to naturally release for 20 minutes.5. After 20 minutes, open the pressure valve.6. Open the lid and sitr the oats. They will appear watery, but will thicken upon stirring.  Serve warm with maple syrup, cinnamon, or a splash of milk.  Leftover oatmeal will keep in the fridge for 4-6 days or in the freezer for up to 3 months. You can scoop oatmeal into muffin tins or silicone muffin cups, freeze, and transfer to a freezer baggie. Warm oatmeal in the microwave for 2-3 minutes and add your favorite toppings.  ADD-INs: fresh or dried fruit, berries, nuts, chocolate chips, coconut, almond/cookie/peanut butters, caramel, ams, brown sugar, maple syrup, honey, cinnamon, nutmeg, vanilla, hot chocolate mix, yogurt, milk or protein powder.
Details
Prep time: Cook time: Total time: 39Yield: 6-8 servings

4/17/18

0 Boneless Chicken: Frozen to Fab in Your Pressure Cooker!

Put frozen boneless, skinless chicken breasts directly into your pressure cooker or Instant Pot for moist, tender chicken, ready to use in your favorite recipes: casseroles, quesadilla, pizza, enchiladas, tacquitos, pasta, salad, soups, or add your favorite BBQ sauce for a hot chicken sandwich.


You can slice it, dice it, or shred it. Cooking chicken in a pressure cooker can be tricky. If it is over cooked, it will be rubbery and dry. If it is undercooked, it can be chewy and not safe to eat. 


I use my FoodSaver to freeze my boneless chicken. In addition to marking the date on the Food Saver bags with a Sharpie, I also put the weight, as it is helpful for not only in recipes, but for cooking times as well. This is a one pound boneless chicken breast weighed on my favorite OXO digital scale.

If you are freezing chicken breasts for pressure cooking, freeze them in a single layer or in individual portions for best cooking.


Cooking frozen chicken doesn't require a lot of water, so I use 1/4 cup water or chicken broth and put the frozen chicken breast on top. I love using Better Than Bouillon for this and many of my recipes.

It is important to keep your chicken in a single layer, or use a tall trivet or steamer basket to separate layers of chicken so they are not stacked right on top of each other. If you don't have a trivet, try to scatter the chicken so they are not stacked on top of each other.

If your chicken breasts are stuck together in a solid block, it's best to separate them. Run the frozen chicken under running tap water and pry them apart.


The cook time formula that I use is 1 minute per ounce, with a 10-15 minute natural pressure release (NPR). If chicken is over cooked, it can taste dry and chewy. If you have chicken in varying sizes, take the average weight of the chicken and use that for your cook time.

Select High pressure and 16 minutes for this 1 pound chicken breast. Make sure your pressure valve is closed!


At the end of the cook time, let the pressure cooker naturally release by waiting 10 minutes. At the end of 10 minutes, open the pressure valve to release any remaining pressure, and open your cooker.

Take the temp of your chicken by inserting an accurate thermometer (I am using my Thermoworks Mk4) in to the thickest part of the meat. You want your internal temp to be 165°F.

The first time I took the temp, it was 160°F, so I closed the pressure cooker and waited another 5 minutes. Took the temperature again, and it was a perfect 165°F.

When you cover your meat, it is still continuing to cook, and the temperature can go up as much as 1 degree every minute.


I measured the amount of liquid remaining in the pot. I started with 1/4 cup chicken broth and ended up with nearly 3 oz, or 1/3 cup. You can save this broth and use it in your recipes.

OXO 1 cup Meauring Cup

To shred your chicken quickly, cut it into large chunks and put it in the bowl of your mixer. If you have a hand mixer, you can do this directly in your stainless steel pressure cooker pot.

You can shred cooked chicken, beef or pork as well!


Use the flat blade if you have a Kitchen Aid stand mixer, and use a low speed.


In seconds, you will have shredded chicken, ready to use!


You can freeze your cooked chicken by putting cooled chicken in a freezer safe bag, rollin it up to remove excess air, or by using a Food Saver. You can even add some of the remaining chicken broth left over from cooking to keep your chicken moist during freezing. Cooked chicken will keep well in the freezer for 4-6 months.

Check out my other Frozen to Fab recipes!
Frozen to Fab BBQ Chicken
Frozen to Fab Turkey Breast


print recipe

Frozen to Fab Boneless Chicken - Pressure Cooker
Use your pressure cooker to quickly thaw & cook your boneless chicken breast. Use a thermometer to make sure the internal temp at the thickest part reads at least 165°F. Use your electric hand or stand mixer to quickly shred your cooked chicken.
Ingredients
  • 1 pound frozen boneless chicken breast
  • 1/4 cup water or chicken broth
Instructions
1. Put 1/4 cup of water or chicken broth in the pressure cooker pot.2. Place frozen chicken breast into pot.3. Close the lid and pressure valve. Select HIGH pressure, 1 minute per ounce. For 1 pound chicken breast, use 16 minutes for your cook time. If you are cooking more than one breast, use the average weight of the combined breasts as your cook time. Keep the chicken in a single layer or separate the chicken by using a tall trivet or criss-crossing the chicken at different angles.4. At the end of the cook time, set a timer for 10 minutes for the natural pressure release. (NPR)5. After 10 minutes, open the pressure valve to release any remaining pressure. Open the cooker and use an accurate thermometer inserted at the thickest part of the meat. Internal temperature should read at least 165°F. If the temperature is lower, close your cooker and wait another 5-10 minutes. The internal temp should rise 1 degree, every minute.6. Remove the chicken breast from the cooker, cut it into 2-3 chunks and put into a bowl of your electric stand mixer. Reserve the remaining liquid for another recipe as chicken broth.7. Using the flat blade attachment and the low speed setting for 10-15 seconds to shred your chicken to your desired texture.Your shredded chicken is now ready to use in any of your favorite recipes. Use in casseroles, quesadillas, pizza, burritos, pasta, salads, soups, or add your favorite BBQ sauce for a hot chicken sandwich. To Freeze: Put cooled chicken in freezer safe bags, roll the bag to remove the air, or use a Food Saver to prevent any freezer burn. If you add some of the reserved chicken broth, your chicken will stay more moist. Freeze for 4-6 months.
Details
Prep time: Cook time: Total time: Yield: 1 1/2 cups shredded chicken

11/19/17

11 Frozen Boneless Turkey Breast in an Hour!


Would you believe that you can cook a frozen, nearly 3 pound turkey breast, in an hour?

If you have a pressure cooker, this is definitely doable!

I saw this on sale at our local grocery store and it intrigued me...

Oven Ready! No Thawing! Boneless Turkey Breast with gravy packet!

Jennie-O Oven Ready Boneless Turkey Breast

For the last 8 years, I have been making my Herb Roasted Turkey Breast, a family favorite that everyone looks forward to eating - perfectly seasoned with herbs, lemon, garlic, with moist, tender slices of turkey each and every time.

The problem with cooking most turkey is that it is frozen....and you need to thaw it out over a couple of days in the fridge. For every 5 pounds, you need 24 hours to thaw, so a 10-15 pound turkey can take 3 days to thaw!!

Another problem is that on Thanksgiving, my oven is usually taken up with baking dressing or dinner rolls, so cooking this in my pressure cooker will definitely help.


Let's see how this works out. I'm using a frozen, boneless chicken formula that a member of the Instant Pot Facebook Community shared for boneless chicken breasts:

High pressure, 1 minute per ounce, 10-15 min natural release. With a turkey breast, you will need to use a FULL natural release.

A natural release is the time the food sits in the pressure cooker AFTER the cook time. A FULL NPR is when the silver float valve drops and you can safely open your pressure cooker.

The package says 2.75 pounds, but I should have weighed it with my OXO scale to make sure. This translates to 44 oz, so 44 minutes and a full natural release (about 15 minutes) is what I used. The package says to cook in the oven for 1 hour and 40 minutes, so if this can save me time and oven space, I'm sold!

The turkey breast is fully seasoned, and I set it on the trivet that comes with the pressure cooker, and added 2 cups of water. I probably could use less, as the turkey release another cup...

Here's what it looked liked after a full NPR (natural pressure release). The NPR took about 15-20 minutes.

Smells great!


Checked the temp at the thickest part with my digital thermometer and it read 167°F - fully cooked!

You want the temp to be in the 160°-165°F range, but this meat was not dry at all...

Slice the turkey against the grain, to avoid shredding and get perfect slices. I cannot believe how incredibly moist this turkey breast is!


Cover your turkey breast with aluminum foil to let it rest, retain the heat and stay moist while you make the gravy.

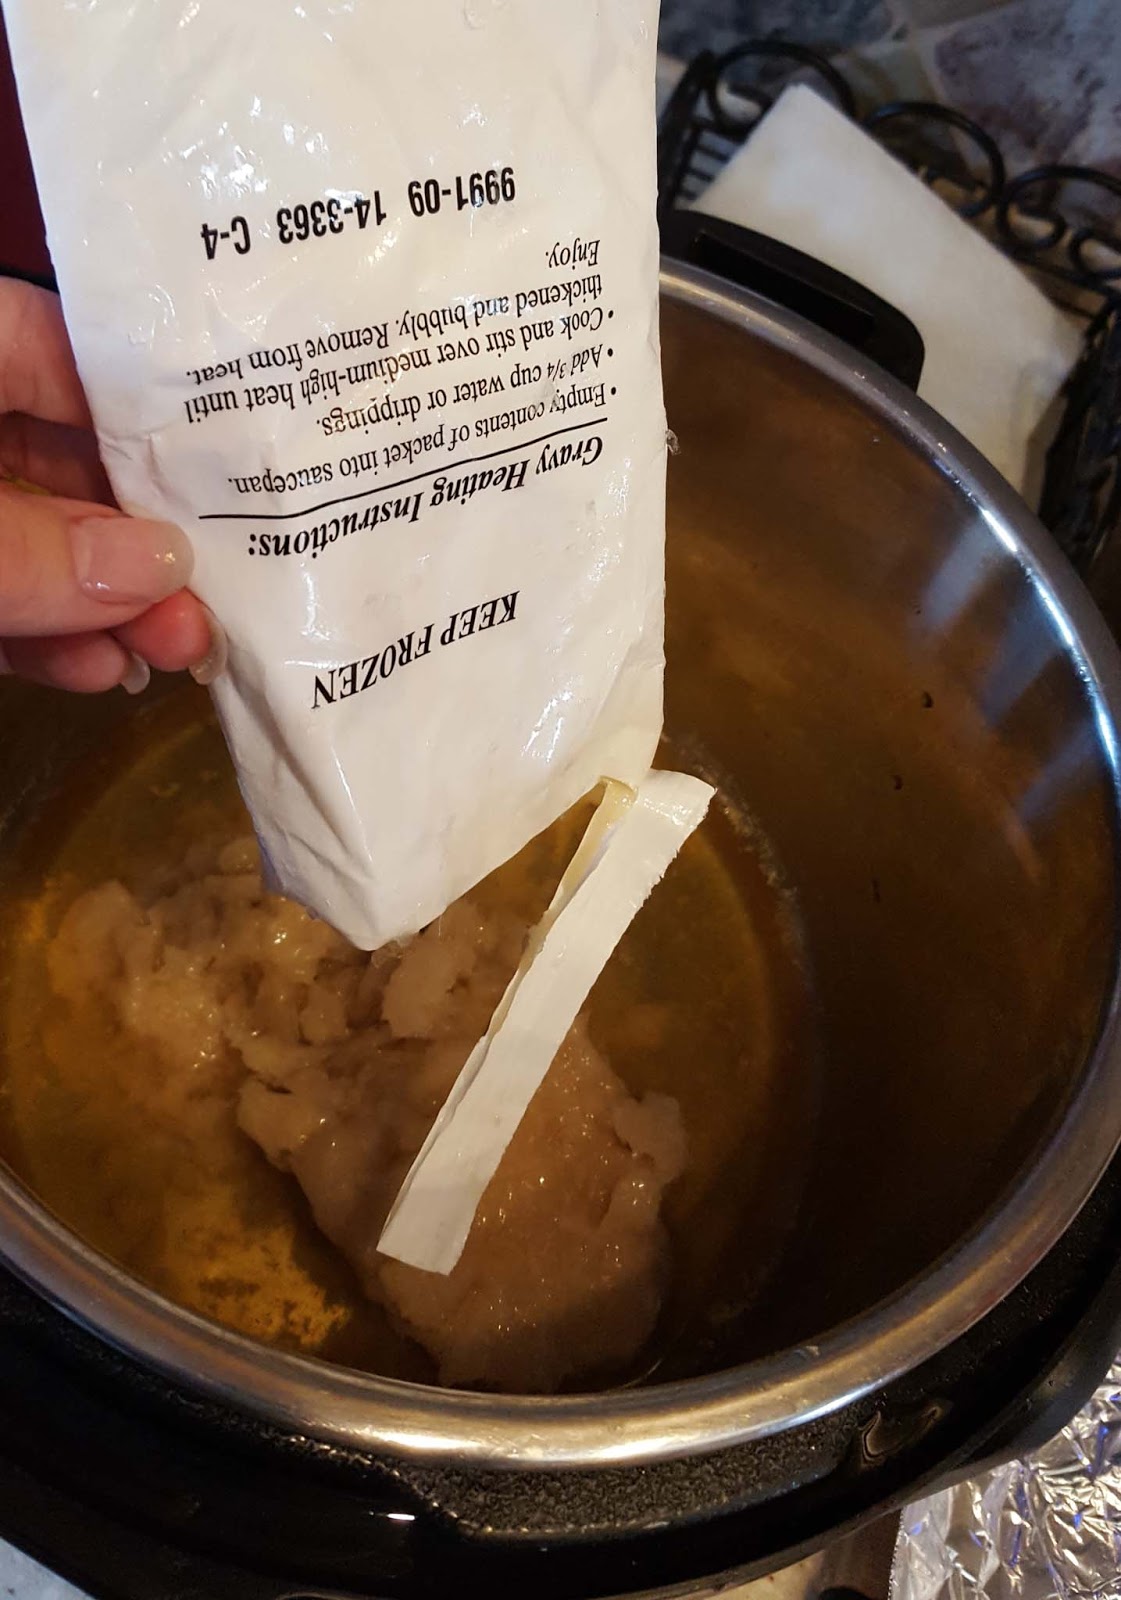
I reserved 3/4 cup of the broth and dumped the frozen packet of gravy into the pot.


Set it on saute - high and stirred it with my favorite flat whisk. Perfect for getting every nook and cranny of the pot and getting a smooth gravy or sauce.


Paired with Creamy Pressure Cooked Mashed Potatoes, this will be a very quick and easy dinner!


print recipe

Frozen Boneless Turkey Breast - Pressure Cook
Use your pressure cooker to cook a moist & tender boneless turkey breast in under an hour, start to finish! Cooking from frozen, in the oven, takes 2.5 hours. You can double this recipe using two boneless breasts, just lay them side by side & do not stack them on top of each other,
Ingredients
  • 2.75 pounds Frozen Turkey Breast or Roast- I used Jennie-O Oven Ready
  • 2 cups water
  • Trivet - metal steam rack
Instructions
1. Remove the plastic shrink wrap and gravy packet from the frozen turkey. You may need to hold the shrink wrapped turkey under hot tap water to separate it from the frozen meat. If using a ROAST, keep the twine on the meat.2. Put 2 cups of water into the pressure cooker pot.3. Set the trivet inside the pot.4. Place the frozen turkey breast or roast directly on the rack.5. Select HIGH pressure and Set the time according to the CHART below.6. When cook time is finished, turn the pressure cooker OFF and allow the pressure to release naturally, until the float pin drops, about 15-20 minutes. 7. Test the turkey with a thermometer inserted into the thickest part of the meat. It should read at least 160°F. If it is less than 160°F, pressure cook your meat for an additional 2-3 minutes, with a full natural release. 8. Using the trivet handles, or two flat spatulas, lift the turkey onto a carving board or plate. 9. Cover the turkey with aluminum foil to rest and retain the heat. While resting, the temp of your turkey will go up another 5°.10. Remove all BUT 3/4 cup of the liquid broth from your pressure cooker. 11. Open the gravy packet and put into the pot of broth. 12. Select Saute/Browning and stir until thickened, about 3-5 minutes. Slice your turkey breast against the grain and serve with hot gravy. TURKEY TIMING CHARTFrozen: 1 minute for each OUNCE (ex: 44 oz = 44 minutes) Thawed: 10 min per POUND (2.75 lb = 28 minutes)
Details
Prep time: Cook time: Total time: Yield: 8-10 servings

11/16/17

0 Gingerbread Waffles & Buttermilk Syrup


A thick, crisp, light and fluffy Belgian waffle, drenched in syrup, gets a makeover with spices and buttermilk syrup. Buttermilk Waffles are a weekend favorite, as you can fill each square with the perfect amount of syrup,  just right for each bite.

With the holidays around the corner, I looked for a spiced waffle and this Gingerbread Waffle recipe from King Arthur Flour fits the bill. The buttermilk syrup is just right, adding a sweet touch and compliments the spices.

WaringPro Waffle Maker

Granted, I don't have all the ingredients to make these festive waffles, but there are some substitutions you can use.

For instance, the recipe calls for sour cream and molasses. I used homemade yogurt, which works just as well as sour cream, adding a slight tang and providing moisture to the batter.  You can also use soured milk (lemon juice + milk) or buttermilk as a substitute. If you make your own yogurt, you can use whey as an acid to sour the milk.

Molasses is something that I have on hand for making soft gingerbread men cookies, but I don't use it year round for anything else. To me, it has a very strong taste. You can use brown sugar (dark or light), dark corn syrup, or even maple syrup as a substitute for molasses. I opted to use brown sugar.


Buttermilk syrup is soooooo good. It is sweet, slightly tangy, and made with pure vanilla extract, I think it would be great to bottle and give as gifts. It's fantastic as a pancake/waffle syrup, sauce, or ice cream topping.

I have Saco buttermilk powder on hand for making bread, biscuits, pancakes and waffles, but it was easier to make soured milk.

Soured milk is made by putting 1 tablespoon of lemon juice (you can use white vinegar) into a measuring cup and filling the measuring cup up to 3/4 cup line. Let the milk sit for a few minutes and it will begin to curdle and sour. It's a great substitute for buttermilk in many recipes: Waffles, Flaky Biscuits, etc)

Heat the sugar, buttermilk (soured milk) and butter in a heavy bottom 3 quart sauce pan. Using this size of pan is important, as the syrup will double in size while heating. A thick, heavy bottom pan will help keep the mixture from burning.


You will want to stir it constantly, to keep the bubbling under control.  A flat whisk is a great tool for this. After it reaches a boil, cook it only for 5 minutes, then remove it from the stove. Wait till the bubbling subsides and add the baking soda and pure vanilla extract.

The baking soda gives the syrup a foamy, airy texture and the extract will give it a lovely vanilla flavor.


TIPS: Use a large pot. The syrup will foam, bubble and double in size. Stirring constantly helps keep the bubbling under control.
          Do not cook it for very long. If you cook it longer, it will become darker and more like a caramel candy. It will also set firmer and not be as syrup-y if cooked longer. It will become more chewy.
          Do not walk away. Stir it and stir it constantly. If you walk away, it will double in size and possibly overflow, creating a big, sticky mess.
This Anchor Hocking 10 oz glass pitcher is perfect for serving and pouring hot, lovely, syrup...


Gingerbread Waffles
Adapted from King Arthur Flour

2 cups all purpose flour (can use a mix of whole white wheat and all purpose flours)
2 Tablespoons baking powder
1/2 teaspoon baking soda
1/2 teaspoon salt
2 teaspoons ground powdered ginger
1/4 teaspoon ground nutmeg
1/4 teaspoon ground cloves
4 large eggs
6 Tablespoons butter, melted and cooled
1 cup milk
1/2 cup plain yogurt or sour cream
3 Tablespoons brown sugar, molasses, maple syrup or dark corn syrup

Preheat your waffle maker.
In a mixing bowl, whisk together flour, baking powder, baking soda, salt, and spices.
In another separate bowl, mix together eggs, melted butter, milk, yogurt and brown sugar.
Pour the milk/egg mixture into the flour/spice mixture, stirring until just combined.
A few lumps is o.k.
Ladle about 3/4 cup batter into your waffle maker and cook according to your waffle maker directions.
Makes about 5-6 Belgian style waffles.

Can make ahead and store in freezer bags.
Reheat by putting your waffles in the toaster.

Enjoy!


Buttermilk Syrup
1/2 cup butter
1 1/2 cups granulated sugar
3/4 cup butter milk -or- 1 tablespoon lemon juice and enough milk to make 3/4 cup. Let sit 5 minutes.
1 teaspoon baking soda
1 1/2 teaspoons vanilla extract

In a heavy 3 qt saucepan, melt the butter. Add sugar and buttermilk (or soured milk).
Stir to dissolve.
Over medium heat, allow mixture to come to a rolling boil, stirring constantly for 5 minutes.
Remove saucepan from heat. Wait for bubbles to subside.
Add baking soda - stir vigorously, as it will foam.
Add vanilla extract.
Serve warm over pancakes, waffles, cake or ice cream.

Refrigerate up to 2 weeks. Reheat to serve.


10/25/17

0 One Pot Sweet & Sour Meatballs with Rice - Pot In Pot Pressure Cooking


A perfect blend of sweet, tangy, with the slight crunch of red and green peppers, this super easy pot-in-pot meal with fluffy rice can be made together, at the same time, in your pressure cooker, saving you a couple of pots, pans and time!

"Pot in Pot" or PIP cooking, is food placed in a separate (oven safe) bowl or dish and not directly set on the bottom of the pressure cooking pot. Instead, it is set on a trivet, (stainless steel steam rack) over some water.

The benefits of PIP cooking are that food doesn't stick or scorch on the bottom of the pot, and you can cook multiple foods with similar cook times, in separate dishes.

Pots to Use
Glass, silicone and ceramic oven safe pots hold in heat and foods take longer to cook, so I prefer to use stainless steel or aluminum for PIP cooking. You can find a variety of bowls online that are 7" in diameter that will fit well in a 6 quart pressure cooker pot. Your local Asian Market is a great source for small cooking pots and strainers!

IKEA has a 8" stainless steel bowl that fits in the 6qt pot, but is 3.5" tall and when stacked on top of the steamer basket, it was taller than the pot. When stacking 2 pots, you can use a trivet or wood chopsticks in between the layers. There is a stackable pot with locking handles that you can use. You can line your cheesecake pan or push pan with aluminum foil, to create a leak-proof bowl, like I did for this recipe.

Some examples of PIP cooking are Apple Pie Bread Pudding, Orange Curd (can use this recipe for Lemon or Lime curd as well), and Chocolate Cheesecake,

This particular recipe is using 2 'pots' or rather, one pot and one steamer basket. For cooking multiple kinds of foods at the same time, it's best to use foods that have similar cook times.

Meatballs

You can use pre-cooked meatballs, but making your own from scratch only takes 10 minutes and is very simple. You can even make a large batch of meatballs in your pressure cooker and freeze for later use in your favorite recipes.

Lean ground beef, bread crumbs, onion powder, garlic, salt and pepper.

Kitchen Tip: For bread crumbs, I'll take a frozen slice of bread (usually the crust) and put it into the food processor. You can also use crushed saltine crackers, but if you do, you will want to reduce or omit the salt in the recipe.

I like to add some fresh grated ginger to my meatballs for a more Asian inspired flavor. 

Kitchen Tip: I peel my ginger root and keep it in the freezer. Take out your frozen ginger root, use a microplane grater/zester, and you have instant fresh ginger.  Once you've used fresh ginger in a recipe, you'll never go back to the powdered stuff. Try it.

Mix well, using a fork or your hands.

Me? Touch raw meat? Nope. I use plastic disposable gloves for that.


Use a 2 tablespoon cookie scoop to portion your meatballs. You can even take the extra step and roll the balls of meat between your hands for perfectly smooth, round meatballs. One pound of lean ground beef will make 18 meatballs.

Water goes into the pressure cooker, then a lotus style steamer basket inside the pot. If you have a similar insert with drainage holes, feel free to use it.

Place your meatballs in a single layer, directly on top of the steamer basket.


Rice

I am using Calrose rice, a short grain rice. You will want to check out this site for cook times using other types of rice. You will want to keep your rice cook time as close as you can to the meatball cook time, which is 5 minutes. With the Calrose rice, I used 6 minutes with a 10 min NPR. The meatballs and rice were both cooked perfectly.

For the rice, you will want to rinse your rice. Why?

It will be less sticky.


Put the rice in a metal strainer and set it over a bowl.

Fill with cool water, swish the rice with your fingertips, and lift the strainer to drain.

Do this 3-4 times, or until the water is clear.

To cook the rice, I wanted to use what I had on hand, a 7" Fat Daddio's push pan. A push pan has a removable bottom, which is perfect for removing a cake, cheesecake or lasagne, but not so great for making rice, as all the liquid would leak out. Fat Daddio's makes a 7" pan that has a solid bottom. It is only 3" tall, so it should fit along with the lotus steamer basket.  

I turned my push pan into a sealed pot by wrapping a single sheet of aluminum foil around the disk and setting it inside the push pan.

Put the rinsed rice in your prepared pan. Set it on top of your meatballs. Cover the rice with water.

You don't need to cover the rice with foil.

*It is important to make sure that your pan, when stacked, is not taller than the pot. 


While your meatballs and rice are cooking, cut your red/green peppers and prepare your sauce.

I like to cut the peppers into 1" bite sized squares.

Sauce

Stir together your brown sugar, cornstarch, water, rice vinegar, soy sauce, and pineapple juice.

After cooking, remove your rice and meatballs. Cover to keep rice and meat to keep warm.
(I stick both in the microwave).

Drain the excess water from the pot. (Meatball juice)

Add your sauce, pineapple and cut peppers.

Use saute/normal - or the browning setting, and stir for a few minutes, until thickened.

Add your meatballs. Doesn't it look great?


 Serve hot, over your perfect, fluffy rice. Enjoy!


Print Friendly and PDF
One Pot Sweet & Sour Meatballs with Rice
adapted from KimmyD on Allrecipes.com

Ingredients
Meatballs - you can use frozen pre-cooked or make your own, cook and freeze.
1 pound lean ground beef
1 egg
1/4 cup dry bread crumbs (or crushed saltine crackers)
1/2 teaspoon onion powder (or 1/2 cup small onion, diced)
1 clove of garlic, pressed or minced (I love my garlic press!)
1 teaspoon salt
1/2 teaspoon pepper
1/2 teaspoon fresh grated ginger (or 1/8 teaspoon powdered ginger)
1 Tablespoon milk

Instructions
Mix together with a fork or by hand. Shape into 18 meatballs or use a 2T. cookie scoop.

Pour 1 cup of water into the pressure cooker.
Set a lotus or similar steamer basket into the pot.
Place your meatballs in a single layer.

Rice
Ingredients
1 1/2 cups Calrose or similar short grain rice, rinsed well
1 3/4 cups water

Instructions
Put rice and water in a food safe stainless steel pot and set it on top of the meatballs.

Put the pressure cooker lid on your cooker, and close the pressure valve or set it to Sealing.

Set it for HIGH pressure and 6 minutes.

When cooking time is finished, use a 10 minute natural release (NPR) by setting a timer.

After the NPR, open your pressure valve and release any remaining steam.

Remove the rice, meatballs, cover and set aside.

Sauce
While your meat & rice are cooking, prepare your sauce and cut your peppers.
Mix together:
Ingredients
1/2 cup packed brown sugar
8 oz can pineapple chunks & juice
3 Tablespoons of cornstarch
1/4 cup rice vinegar (or use distilled white vinegar, or apple cider vinegar)

Instructions
Pour mixture into the pressure cooker. Set it on Browning or Saute (normal). Add:

1/2 red pepper, cored, membrane/seeds removed, cut into 1" pieces
1/2 green pepper, cored, membrane/seeds removed, cut into 1" pieces

Cook for 2-3 minutes, or until sauce has thickened.
Add meatballs, stir to coat.

Serve your Sweet & Sour Meatballs over your cooked rice.

Enjoy!


Related Posts Plugin for WordPress, Blogger...
Pin It button on image hover