Let me introduce this lovely, chewy water bagel that rival the ones from your local bakery. Bakeries often "steam-bake" their bagels, making them light and chewy, but often lack in flavor that these boiled bagels can give you.
I made bagels many, many years ago and swore I would never bake them again. They were too time consuming; had too many steps. I was pleasantly surprised at how easy and simple these were to make!
It begins with a batter-like sponge of yeast, bread flour and water.
I don't have bread flour, so I used 1 Tablespoon of vital wheat
gluten plus enough all purpose flour to equal 4 cups.
After 1-2 hours, it is a bubbly mass.
Add more yeast...
more high gluten (bread flour or APF with vital wheat gluten), salt and malt powder.
What is malt powder? It is a derivative of roasted barley. It converts the dough starches into sugar, promotes a strong rise, gives it great texture and that beautiful brown crust. You
can find malt powder and syrup at Kingarthurflour.com. Only 2 teaspoons are needed for this recipe, and the rest can be stored in your freezer.
Do not confuse malt powder with the malted
milk powder that you use for shakes, etc. It is not the same thing!

If you don't have this powder, you can use honey, brown sugar or malt syrup.
O.k., for those of you who have the Classic 4.5 qt. 250 watt Kitchen Aid mixer,
DO NOT USE it for this recipe. You will
kill (burn out) your mixer with this very stiff dough. I recommend an electric mixer that is at least 450 watts or higher. Oh, and yes, a Bosch mixer will work!
Knead by hand or use a mixer till you have a smooth, pliable dough.
The original recipe suggests weighing the dough into 4.5 oz. portions, which make 12
VERY LARGE COSTCO SIZED bagels. I prefer to make the 2.25 oz size, which makes 24 perfect mini bagels for sandwiches, mini pizzas, etc.


Each portion is rolled into a ball, with the ends tucked neatly underneath....
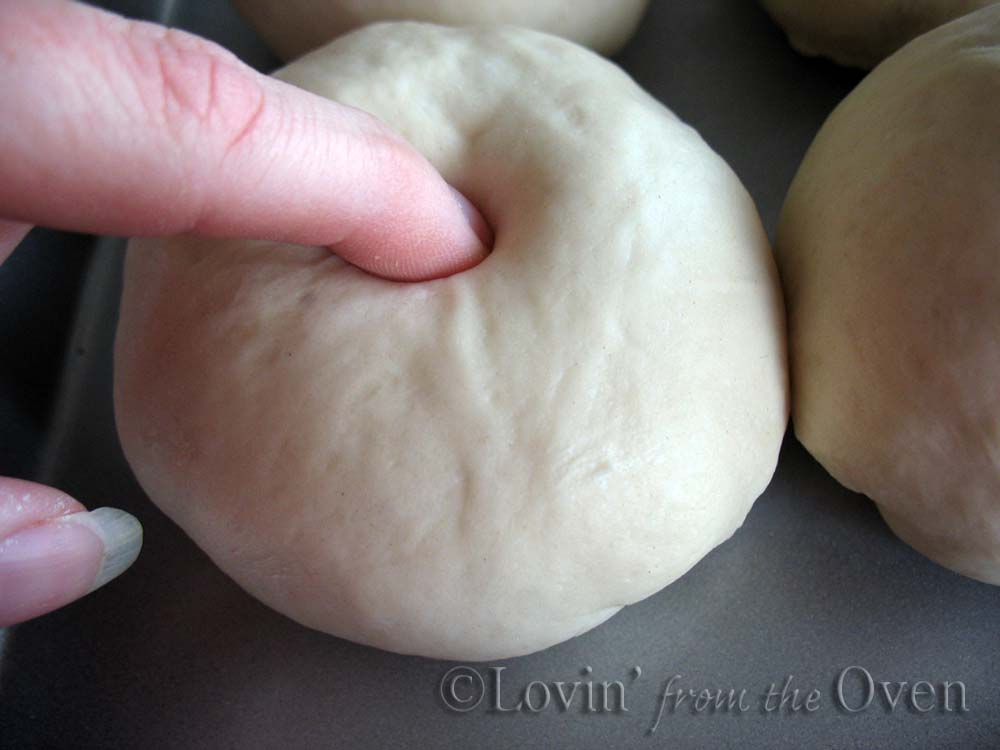
After a 10 minute rest, I poke a hole in the middle...
 Move over, Pillsbury Dough Boy...
And stretch it out with my fingers until I get a 1-2" sized hole.
The shaped bagels are covered with plastic wrap for another 10 minute rest.
This part is new to me. After 10 minutes, you give one bagel the "float test." Why do the float test? It will let you know exactly when to put the bagels into the fridge to slow down the rising process. If you wait too long, your bagels may rise too much and deflate during baking.

Drop the bagel into a bowl of room temperature water. If it floats, it's ready to go into the fridge. If not, wait another 5-10 minutes and test the bagel again.
This floated immediately. It floats, it floats!!
Bagels are covered with plastic wrap and put into the fridge for up to 2 days. Make sure no air can get into the plastic wrap or your bagels will develop a "crust" where the air comes in contact.
Set it and forget it, awriiiiiight!
When you are ready to bake, set your oven, and get a large pot of water ready.
Add baking 1 T. soda to your water. This is one of the secrets to a chewy crust!
These are boiled for 30 seconds to 1 minute on each side...
and immediately dunked into toppings of your choice.
My boys love the EVERYTHING topping. This is equal parts of sesame seed, coarse salt, dried garlic, dried onion and poppy seed. I found the garlic and onion at Winco. Hooray for bulk spices!
Tip: I couldn't bring myself to pay $5 for 1 oz. of sesame seeds. I spoke to my local baker and he sold me 2 oz. for .60 cents!

Immediately bake the bagels for 5 minutes at 500 degrees, rotate pans, drop the temperature to 450 degrees and bake for another 5 minutes.
Cool on a wire rack for 15 minutes, and they are ready to eat!!!!
My favorite?
The Asiago cheese topped bagels....
The verdict?
A soft, dense, chewy bagel that is worthy of cream cheese, jam, or your favorite sandwich fillings ~
I will be making these again.

And again.
Bagel Recipe
(full page printable recipe)