
Showing posts with label Holidays. Show all posts

11/12/21

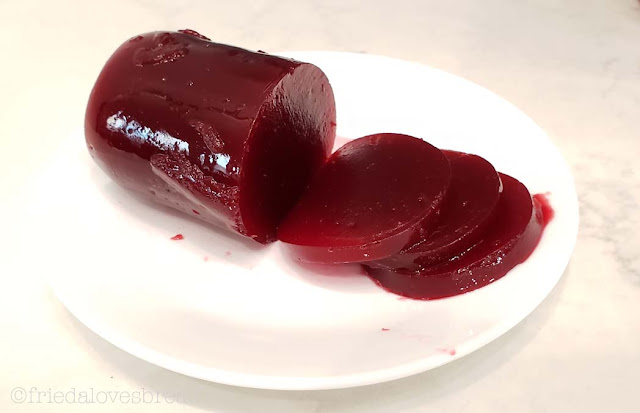
3 Instant Pot Orange Cranberry Jelly (No Pectin)


Oh. My.  This is way better than the store bought canned jelly! 
Cranberries & orange juice make this a winning combination for making your own cranberry jelly, a MUST for your holiday meal!  

Cranberries naturally are rich in pectin, so if you cook this to the correct stage as described in the recipe, it will set into a beautiful, sliceable jelly.

The printable recipe below includes Instant Pot pressure cooker, stove top & canning directions. If you have a pressure cooker, it's even easier to make, so give it a try!
It's nice to be able to control the amount of sugar and you can create your own recipe by adding cinnamon or vanilla extract. Follow the recipe as directed if you plan to can this jelly. 

We enjoyed this cranberry jelly so much last year, that I doubled this recipe, enough to can seven jelly jars (8 oz each). You can use your Instant Pot to water bath (atmospheric) can this jelly. Look for 8 oz canning jars with straight sides for easy removal.

Step By Step Directions

1. Wash 3 cups of fresh or frozen cranberries and drain in a strainer
2. Zest and juice 1 large orange (1/2 cup)
3. Add orange juice, water, rinsed cranberries, zest & salt to your Instant Pot.
4. Cover, close pressure valve, select High pressure for 5 minutes.
5. When time is up, wait 5 minutes for a natural pressure release.
6. Open pressure valve, releasing any remaining steam. Open your cooker.


7. Puree cranberries using an immersion blender (food mill, food processor, or blender).
8. Push the cranberry mash with a silicone spatula through a strainer to remove skin and seeds. (Using a food mill will allow you to skip this step).
9. Return mixture to Instant Pot. (I used the stove to cook the jelly, while the Instant Pot kept my jars hot & ready for canning)
10. Add sugar and cook on Saute Medium (Normal), stirring constantly*, until mixture begins to drip from the spatula in a "sheet." *To keep bubbling from spattering, stirring constantly helps. I used a heat resistant silicone spatula.
"Sheeting" When mixture begins to fall from the spatula as a thick sheet instead of thin drips
11. Do the "plate test" to determine if jelly is thick enough to set. 
      ~Put a small plate to chill in the fridge.
      ~Put a small amount of jelly on the chilled plate.
      ~Put plate back into the freezer until it is cooled to room temperature (2-3 minutes).
      ~Remove plate from the freezer. Gently run a clean finger or spoon through the middle of the jelly.
      ~If it separates and slooooowly returns to its original form, the jelly is ready.
Plate Test 
12. Transfer jelly into clean jars to store in the fridge (10-14 days).
**Straight sided jars work best to get easily get jelly out in one piece. 
Canning Funnel

To Can the Jelly:
If you want to can your jelly for long term storage (2 years), 
1. Put the HOT mixture into HOT clean jars, leaving 1/4" headspace. 
2. Run a clean knife in the jelly to remove air bubbles or rattle the jar on the counter to bring up any air bubbles.
3. Wipe the rim of the jar with a clean, wet paper towel. 
4. Place canning lid and ring on jar, turning the ring "finger tip" tight. This means turning the ring till it stops. Do not tighten past this point.

5. In a water bath, steam canner or using this method with your Instant Pot, process jars for 15 minutes at sea level. Add more time if you are above sea level (see chart in printable recipe below).
  • 1,001-3,000 feet = add 5 minutes
  • 3,001-6,000 feet = add 10 minutes
  • 6,001-8,000 feet = add 15 minutes
  • 8,001-10,000 feet = add 20 minutes

6. Remove hot jars using a jar lifter and place on a wood cutting board or cooling rack.

17. Allow jars to completely cool. Overnight is great. Do not disturb jars. If jars do not seal, place in the fridge and enjoy the jelly over the next week. 

To remove jelly, run a thin knife or offset spatula between the jelly and the jar. Jelly will slide out and look so awesome on the plate!

You can now enjoy your homemade cranberry jelly with all your favorite fixings....even better the next day with turkey sandwiches on homemade rolls. YUM!



Homemade Orange Cranberry Jelly

Orange Cranberry Jelly

Yield: 3 1/2 cups
Author: Frieda Franchina
Prep time: 15 min
Cook time: 45 min
Total time:  60 min
Orange juice elevates this simple cranberry jelly. Double the recipe to make a large batch and can them for holiday gifts or to enjoy year round. Recipe includes stove top, pressure cooker & canning instructions below.

Ingredients:

  • 3 cups (one 12 oz bag) fresh or frozen cranberries
  • 1/2 cup orange juice (about 2 large oranges)
  • 1/2 cup water
  • 3/4 cup + 2 Tablespoons granulated sugar
  • 1 teaspoon orange zest
  • pinch of salt

Instructions:

Orange Cranberry Jelly

  1. In a medium saucepan, combine orange juice & water to a boil over medium-high heat.
  2. Add cranberries, orange zest and salt and return to a boil over med-high heat.
  3. Reduce the heat to medium and boil gently for 10-15 minutes, stirring, until cranberries burst open. 
  4. Remove from heat & using an immersion blender, food processor or blender, puree the mixture until smooth.
  5. In a fine mesh sieve set over a medium bowl, pour mixture into sieve and push mixture through the sieve with a silicone spatula until only skins & seeds remain.
  6. Transfer this mixture into a medium saucepan & add sugar. over medium heat, bringing it to a gentle boil.
  7. Over medium heat, continue a gentle boil, stirring frequently for about 20-30 minutes, until mixture passes the sheeting or cold plate test for gelling.
  8. Store jelly, covered in refrigerator, for 7-10 days or freeze for up to 3 months.
Pressure Cooker: 
    1. Add orange juice, water, cranberries, orange zest & salt to cooker. 
    2. Close cooker, pressure valve, and select HIGH pressure for 5 minutes.
    3. At the end of cooking time, allow cooker to naturally release for 5-10 minutes (NPR). 
    4. Open pressure valve to release any remaining pressure. 
    5. Follow steps 4-7 above. You can use Saute Normal in Step 6.
Canning: 
Transfer hot jelly into hot jars with 1/4" headspace. Run a clean knife through the jelly to get rid of any air bubbles. Wipe jar rims clean. Place lid on jar & secure ring fingertip tight. Process in a hot water bath or steam canner according to directions for 15 minutes. Add more time if you are above sea level:
  • 1,001-3,000 feet = add 5 minutes
  • 3,001-6,000 feet = add 10 minutes
  • 6,001-8,000 feet = add 15 minutes
  • 8,001-10,000 feet = add 20 minutes

4/1/21

0 Creamy Peanut Butter Chocolate Easter Eggs


I couldn't believe how easy it was to make these peanut butter filled chocolate eggs! Just imagine being able to use your favorite chocolate and dipping them...these are dipped in melted semi-sweet chocolate. The filling for this recipe is SO much more creamy than the store bought peanut butter eggs. 

Using this recipe for the filling, I simply roll it 3/4" thick between two sheets of plastic wrap, much like these gingerbread cut outs in this picture. 


I like using this 2.5" Egg cookie cutter dipped in powdered sugar.


Chill your cutouts and then dip in your favorite melted chocolate. 

Enjoy plain or melt some white chocolate to decorate your chocolate eggs. Use this awesome trick for putting your melted chocolate into your icing bag for easier clean up. It's SO cool!


Enjoy!


Peanut Butter Filling Recipe


10/29/20

3 EASY Pumpkin Butter!

Enjoy this spreadable pumpkin butter that is slightly sweet, perfectly spiced, and ideal on a cracker, toast, or stirred into your favorite yogurt. If you like pumpkin pie, you'll love this delightful treat that can be enjoyed any time! Put this lovely pumpkin butter in a cute decorative jar and it will be a memorable gift for someone you love. 

I got these jars from IKEA, but you can also find these 8oz darling jars here. 

You can use a canned pumpkin, or better yet, make your own pumpkin puree with a pie or Sugar pumpkin. It's incredibly easy to make! 

Can't find a Sugar Pie pumpkin? You can use sweet potatoes or butternut squash instead.


I have been making pumpkin puree in my pressure cooker for several years. You can find my recipe & video here.  It is so easy and tastes better, in my opinion. 

You can use your slow cooker, microwave or stove top to cook your pumpkin butter until it resembles a very thick applesauce. How long depends on how watery or thick your pumpkin puree is. You can find directions for all three methods in the recipe below. 


The ingredients are very simple: pumpkin puree, apple cider, brown sugar, vanilla extract & spices. You can adjust the sugars or  spices to your liking or even use your favorite pumpkin spice. 

The mixture will bubble & pop like a lava pot - to prevent it from escaping out of the pot, you'll want to stir it often, and use a splatter screen shield or a sheet of paper towel over the pot.


The mixture will continue to thicken, caramelize and smell so good! Who needs a candle, right?


How do you know when it's thick enough? 

Use the Cold Plate Test: Put a small plate in your freezer. When it is chilled, put a small dollop of pumpkin butter on the chilled plate. Use your spoon to run a line through the middle of the dollop. If the line remains and doesn't fill the gap, your butter is ready. 


Transfer your butter into storage containers. If you want to freeze the pumpkin butter, you will want to use freezer safe containers and leave some room (head space) for expansion. 

Unlike my Apple Butter or Vanilla Spice Pear Butter, you cannot water bath can or pressure can pumpkin butter. Why? Pumpkin butter is not only a low acid food, it is too dense for it to be safely pressure canned. (Source) You can freeze your pumpkin butter for up to a year.


Uses for Pumpkin Butter

  • spread on toast, crackers
  • add to yogurt
  • top ice cream
  • add to a vanilla shake
  • cake filling
  • pancakes, waffles
  • cinnamon roll filling
  • dip for apples
  • bagel with cream cheese, and much, much more!


Easy Homemade Pumpkin Butter

Easy Homemade Pumpkin Butter

Yield: 5 cups
Author: Frieda Franchina
Prep time: 5 min
Cook time: 30 min
Total time: 35 min
This Pumpkin Butter is a wonderful spread for toast, muffins, or added to yogurt, ice cream or a shake. It makes a great gift for anyone who loves pumpkin pie. I used my electric pressure cooker using the saute setting, but you can find stove top, slow cooker & microwave directions below.

Ingredients:

  • 3.5 cups fresh pumpkin puree -OR- 29 oz can 
  • 1 1/2 cups apple juice or apple cider
  • 1 cup (7.5 oz) light brown sugar
  • 2 teaspoons ground cinnamon
  • 1 teaspoon ground cloves
  • 1/2 teaspoon ground ginger
  • 1/4 teaspoon ground nutmeg
  • 1/2 teaspoon pure vanilla extract

Instructions:

How to Make Easy Homemade Pumpkin Butter

  1. In a medium (3quart) saucepan, combine pumpkin, apple cider, brown sugar and spices, stirring well.
  2. Bring mixture to a boil over medium high heat; reduce to low & simmer, stirring frequently to prevent splatter. Cover pot with a paper towel or splatter screen.
  3. Cook until thickened, about 30 minutes. Put a dollop on a chilled plate, running a spoon through the middle. If the line remains & doesn't fill the gap, your butter is ready.
  4. Add vanilla extract, stirring well.
  5. Transfer butter to storage containers & cool for about 30 minutes.
    Cover & store in the fridge for 2-3 weeks.
    If freezing your butter, allow 1/2" head space, cover & freeze for 6-12 months.
Pressure Cooker: Add all the ingredients to the inner pot (except for vanilla). Select the saute or browning setting, using the *lowest* setting possible. Cook until thickened, stirring often to prevent bubbling. Follow steps 3-5 above.                                                                                                            
Slow Cooker: Add all ingredients (except for vanilla) to insert, cover with paper towel, then lid. Use LOW for 3-4 hours, stirring occasionally. Follow steps 3-5 above. 
Microwave: use a large 3quart glass bowl, cover with a paper towel, High power 6 min, stir, High power 6 min, stir, High power 3 minutes, stir, let cool. Follow steps 3-5 above. 


5/4/20

0 EASY White Chicken Enchiladas


Skip the hassle of rolling your tortillas and try this EASY layered white chicken enchiladas. While I love a traditional red enchilada sauce, this recipe is a true contender. The creamy white sauce pairs well with chicken, allowing the tang of sour cream and spices from the chilies to come through and shine in this family favorite.

This recipe comes from my sweet sister in law, who has adapted her time honored family recipe to meet the tastes of her children. She has tried various sauces, canned, homemade, tweaking the spice level and has settled on this recipe, which I'm so pleased to share with you. Please feel free to tweak it to your family's preferences.

The original recipe calls for a can of cream of chicken soup, but I have been able to make my own homemade version, using butter, flour, milk & Better than Bouillon chicken base. I really love having this BTB chicken base on hand and it keeps in the fridge for at least a year. I use it regularly in chicken soup, my red enchilada sauce, Mexican rice, chicken pot pie, chicken gravy, and much, much more.
Look how creamy and thick! Doesn't this look better than the canned cream of chicken?
I love using this flat whisk for all my sauces. 


The recipe also originally called for canned chicken or turkey. You can cook your own chicken and shred it. I used to thaw/cook my boneless chicken in the microwave. Now, I plunk the frozen chicken into my Instant Pot pressure cooker, add 1/4 cup water, and let it do all the work. This recipe here will show you how easy it is to cook frozen chicken in your pressure cooker.

Do you have an electric hand mixer or stand mixer? Then use it to quickly shred your chicken! Pulse it, so you have control over how chunky you want it. This is my trusty Kitchen Aid stand mixer that I've had for more than 25 years.

Mix together your grated cheese, drained green chilies, chicken and sour cream. This is your FILLING. 

For the SAUCE, mix together the cream of chicken soup and your green enchilada sauce. 

You can use corn or flour tortillas. I like white corn tortillas, so I dip them into the sauce and line six of them into my 9x13 baking dish


Add half of your filling and another layer of six tortillas. 

Pour the white enchilada sauce over the top and sprinkle with a cup of shredded mozzarella cheese. 

Bake uncovered, for 45-60 minutes until golden brown and bubbly.


TIP: Allow this to sit for 20-30 minutes before cutting. This allows it to thicken a little bit for easier cutting into squares. If you try to cut into it while hot, it'll look soupy and be hard to cut. 

Top with shredded lettuce, chopped tomatoes, sour cream or guacamole and serve it with a side of Mexican rice or refried beans.

Enjoy!


print recipe

White Chicken Enchiladas 
Layers of corn or flour tortillas are sandwiched in a simple filling and topped with a creamy sauce and cheese. Corn tortillas more readily absorb the sauce while flour holds their shape more readily. You can use this easy casserole layering style or fill each tortilla individually.
Ingredients
  • 1 pound of cooked chicken, cubed or shredded
  • 1 pound shredded mozzarella cheese (reserve 1 cup for topping)
  • 1-2 small cans green chiles, drained (use 1 can for a mild flavor)
  • 16 oz carton of sour cream
  • SAUCE
  • 1/4 cup butter
  • 1 teaspoon chicken Better than Bouillon
  • 1/4 cup all purpose flour
  • 1 1/3 cup milk
  • 1 large 28oz can green enchilada sauce
  • 1 package of white corn tortillas (12-18)
  • 1 small can of sliced black olives (optional)
Instructions
1. Make the filling: In a medium bowl, mix together cooked chicken, shredded cheese, drained chilies and sour cream. Set aside.2. Make the sauce: In a medium sauce pan over medium heat, melt the butter. Once melted, add the bouillon and flour, stirring it into a thick paste. Cook & stir for one minute, to cook out the raw flour taste.3. Pour the milk all at once into this mixture, stirring until incorporated. Continue to cook over medium heat, stirring until it's the consistency of a thick gravy.4. Remove from the stove and add the entire can of enchilada sauce, mixing well.5. Pour about a cup of this sauce onto a shallow plate or pie dish. 6. Dip a corn tortilla into this mixture, flip it over, coating both sides, and place it into a 9x13 baking pan. Repeat, layering six tortillas.7. Spread half of the meat/cheese filling on top of prepared tortillas. 8. Dip remaining six tortillas, one at a time, placing on top of meat/cheese filling. Spread other half of filling on top, and if desired, layer another six coated tortillas on top. 9. Pour remaining sauce over entire dish and top with 1 cup of reserved shredded cheese. 10. Bake in a preheated 325°F oven for 45-60 minutes or until top is browned and bubbly. Remove from oven and let sit for 20-30 minutes. Cut into squares and serve with shredded lettuce, chopped tomatoes, sour cream or guacamole.
NOTES: Can use 12-16 oz of canned chicken/turkey.
Can use 1 can (10.5oz) cream of chicken soup in place of butter, bouillon, flour and milk.
Can use 1 cup of chicken broth instead of bouillon. Reduce the milk by 1 cup.
Can be made the night before. Cover with plastic wrap and store in the fridge. Remove plastic wrap prior to baking.  


Details
Prep time:15Cook time: Total time: 1Yield: 6-8 servings

5/1/20

0 Restaurant Mexican Rice - Instant Pot or Stove Top


Every time I go to a Mexican restaurant, I judge their quality by the chips, salsa, and rice. Rice should be moist, not oily, fluffy, full of flavor and not have any of that extra stuff....chunks of peppers, onions and whatnot. Your entree is the star of the show, and the rice should be the supporting actor, complementing your main attraction.

This recipe comes from a good friend of mine, who is Hispanic and has shared her authentic recipes with me. One of her time saving secrets is using Caldo de Tomate, a powdered tomato/chicken bouillon and spices that is so good in rice, enchilada sauce, added to shredded chicken for tacos, enchiladas, tacquitos, and much, much more. I keep a jar of this in my fridge, which keeps well for at least a year. If you don't have access to this seasoning, I provide the ingredients in my recipe below that will still make a fantastic Mexcian style rice.


One of the first steps to cooking this recipe is to brown the rice in a little bit of oil. Why? This not only helps keep the rice grains separate, it adds some caramelization and flavor to the rice, so don't skip this step!

There's no need to rinse the rice in this recipe, which is a time saver.

Another secret is using Better Than Boullion, a chicken base, instead of chicken broth. You only need a couple of teaspoons and it also lasts up to a year in the fridge.


I have been making this rice for years on the stove top, but this recipe is easily converted for a pressure cooker. You don't need to use as much liquid, since a pressure cooker keeps much of the liquid inside during cooking. You'll find both methods in my recipe below.

Enjoy!

Pressure Cooker Notes:
*Turn Keep Warm Off. It can cause the rice to stick and burn to the bottom of the pot.
*Rice setting automatically adjusts the time based on the VOLUME of white rice added to the pot. (This is ONLY for white rice)
*Never fill the insert more than half full, as rice foams during cooking.
*Rinsing is not necessary unless directed in the recipe. Rinsing removes starch, but also adds water to the recipe. In pressure cooking, the residual water after rinsing can compensate for what little is lost during the time it takes to bring the cooker to pressure.
*Altitude, location, hardness of your water, age and dryness ALL affect the outcome of your rice.
*Use a 1:1 ratio (1 cup rice, 1 cup water/broth).
*Take notes and adjust the cook time to your preference. Longer cook times result in a softer texture.
*Add more water if you want your rice a little softer.
*Reduce the water if you see water in the cooker after fluffing the rice.


print recipe

Restaurant Mexican Rice - Stove Top & Pressure Cooker
Light, fluffy, moist and perfectly flavored rice that is the perfect accompaniment to any Mexican entree. No need to rinse your rice! Use the other half of your 8oz can of tomato sauce to make enchilada sauce or freeze it for your next batch of rice. If you do not have Caldo de Tomate, use the onion, salt & garlic as directed in the recipe. See Notes in my post for Pressure Cooker adjustments & reduce the broth as noted in the ingredients.
Ingredients
  • 1 cup long grain white rice
  • 1 Tablespoon cooking oil
  • 1 1/2 teaspoons Caldo de Tomate (if using, omit the onion, salt & garlic)
  • 1/4 cup diced onion*
  • 1/2 teaspoon salt*
  • 1/2 teaspoon garlic powder* (or two pressed garlic cloves)
  • 1/2 cup tomato sauce (half of a 8oz can)
  • 2 cups chicken broth (or 2 teaspoons Better Than Bouillon +2 cups water)
  • Pressure Cooker: REDUCE the broth to 1 cup (6qt cooker) or 1,5 cups for 8 qt cooker
Instructions
1. In a medium saucepan, heat oil over medium-high heat.2. Pour in dry long grain rice and stir, cooking until golden brown.3. Toss in Caldo de Tomate -OR- onion, salt and garlic, stirring until fragrant.4. Slowly pour in tomato sauce and chicken broth, stirring to completely coat the browned rice.5. Cover, and bring rice to boil, then quickly reduce heat to LOW.6. Simmer for 20-25 minutes.7. Remove from heat and fluff the rice with a fork, serving immediately. PRESSURE COOK DIRECTIONS1.TURN KEEP WARM OFF. Select Saute Low. Add oil to insert. 2. When Hot, add dry rice, stirring until golden brown.3. Add Caldo de Tomate -OR- onion, salt & garlic, stirring until fragrant.4. Add broth, tomato sauce and stir well.5. Cover, close pressure valve, and select RICE or High Pressure for 8-10 minutes.6. After the cook time has ended, let the cooker naturally release pressure for 11-13 minutes (NPR).7. Open pressure valve, remove the lid and fluff the rice with a fork. Serve immediately. 
Details
Prep time: Cook time: Total time: Yield: 4-6 servings


4/15/20

0 EASY Instant Pot Refried Beans - No Soaking!


Refried beans, a classic Mexican staple at most restaurants and Hispanic homes, are perfect for burritos, tostadas, as a dip, 7 Layer Dip or by themselves. The beauty of making refried beans at home is that you can make them as spicy or as chunky/creamy as you want.

I can almost guarantee that you will find a pressure cooker in just about every Hispanic home. Why? Because pinto beans cook SO quickly and easily for refried beans. The old fashioned stove top recipe has you soak your beans overnight and cook them for 2.5 - 3 hours. With a pressure cooker, no soaking is needed and the whole process from start to finish is under two hours.

Pinto beans are a good source of protein and a great item to have in your long term food storage. The older the beans, the longer the cook time needed to soften them.
Shelf Life: Beans should be stored in a cool, dark place and will keep for at least 3-5 years. After that, beans can be used, but may take much longer to cook to soften.
TIP: To soften old beans, add 1/4 teaspoon baking soda for every pound of beans in your recipe.


Many recipes will caution against using salt until the beans are cooked; however, with pressure cooking, adding salt along with the beans not only enhances their flavor, it helps them hold on to their skins and keep their shape.

Canned green chilies are an easy way to add flavor and control the heat.

TIP: Freeze your chopped onions. I chop, measure, label and freeze. Frozen onions work great in cooking. Don't use frozen onions for recipes that call for raw, uncooked onion (ie. salsa).


Beans cook more evenly in a lot of liquid and any remaining liquid can be used as a broth or to fry the beans in a skillet. You can use water or vegetable broth, or a combo of the two. After cooking, I strain the liquid and put about 1-2 cups back into the pot, along with the cooked beans.


Use an immersion blender if you want smooth and creamy refried beans, or use a potato masher if you like chunky. I like smooth, and my husband likes chunky, so I mash first, take some out for him, and then blend the rest for me.


I use my saute/browning setting to help thicken the beans in my pressure cooker. You can use the traditional method of putting 1 Tablespoon of oil in a heavy, non-stick pan, adding 1 cup of water to the pan, and cooking the beans over low heat until the desired consistency is reached.

Enjoy!


print recipe

Easy No Soak Refried Beans - Pressure Cook
Cooking beans in the pressure cooker are so much faster than cooking them on the stove & no soaking is required! If you have very old beans, try adding 1/4 teaspoon baking soda to the mixture to help soften. Use refried beans in burritos, 7 layer bean dip, tostadas, Mexican pizza
Ingredients
  • 2 cups dried pinto beans (one pound)
  • 1 Tablespoon olive oil, vegetable oil, or bacon grease (helps prevent foaming)
  • 1 cup chopped onion (can use 1 T. onion powder or 3 T. dried onion flakes)
  • 2 Tablespoons minced garlic (1/2 teaspoon garlic powder or 1.5 teaspoons garlic flakes)
  • 1 (4oz) can of diced green chilies (you choose the heat)
  • 1 teaspoon salt
  • 8 cups of water, vegetable broth or combo of the two

  • Instructions
    1. Pick over your dry beans and discard any broken or shriveled beans.2. Rinse beans and drain.3. Put rinsed beans in the pressure cooker.4. Add oil or bacon grease, onions, garlic and chilies to the pressure cooker.5. Cover with 8 cups of water and stir.6. Close the lid, lock the cooker and select HIGH pressure.7. Set the time for 30-35 minutes (previously soaked beans = 20-24 minutes. 8. Allow the pressure cooker to release naturally (NPR). 9. Remove lid away from face & strain the beans in a colander or strainer, reserving the liquid. 10. Puree with an immersion blender or mash with a potato masher to desired consistency. If you wish, you can put 1 Tablespoon of oil in a heavy, non-stick skillet, adding 1 cup of reserved bean water to the pan. Cook beans in pan over low heat, stirring until desired consistency is reached, about 10 minutes. Leftover beans can be frozen in individual portions for up to 3 months.
    Details
    Prep time: 15Cook time: Total time: Yield: about 5 cups

3/2/19

2 One Pot Shepherd's Pie - Instant Pot


This version of Shepherd's Pie, a traditional Irish casserole, is made with ground beef, veggies, gravy and topped with a buttery, garlicky mashed potatoes, and with the help of my Instant Pot pressure cooker, is made all at the same time, in one pot!

Not only does this save cooking time, it saves clean up time as well. Making it on the stove and finishing it in the oven takes 2.5 hours, where using the Instant Pot pressure cooker only takes 30 minutes!

We like to scoop this directly from the pot, but if you want a pretty, table top presentation, you can layer this in a 2.5 quart casserole dish and brown the cheese under the oven broiler.

Chop Stir makes browning ground meats easier!

Pressure Cooking Tips

Build Your Flavors
Cooking in the pressure cooker is all about building flavor, browning the bacon, onions, seasonings and beef to caramelize and bloom the spices. These flavors can be lost if all the ingredients are simply dumped into the pot.

Deglaze the pot
The next tip is to deglaze the pot. This means to add a thin liquid (water, broth, soda, beer, etc) into the pot and let it soften any browned bits that are stuck to the bottom of the pot. Leaving stuck on foods will prevent the pressure cooker from reaching pressure, which is what you need to cook your food quickly.

Layer the Ingredients & DON'T Stir!
Always put the thinnest liquids at the bottom of the pot, adding thicker sauces, & pastes on top.
Do Not Stir.
Why?
Thin liquids create steam, which is what you need to build pressure and cook your food. Stirring a thick sauce or liquid into your thin liquid will make your thin liquid...thicker, which will not create the steam needed to build pressure.

Thin Liquids = create steam = brings your cooker to pressure
Thick Liquids = burn on the bottom = doesn't bring your cooker to pressure

Cook Time Depends on Thickness
The thicker the food, the more time it will take to cook. When you are combining different foods like carrots & potatoes, consider how large you cut the veggies. With veggies, the longer you cook the softer they will become. You can see by this chart (from Lorna Sass, Pressure Perfect), that carrots take less time to cook than potatoes.
In this recipe, since the sauce is warm when the potatoes are adding, the pot will come up to pressure more quickly. As a result, I'm going to add another 1-2 minutes to my cook time.

Potatoes                             Carrots
1" chunks = 7-8 min          1" chunks = 6-7 min
1/2" slices = 5-6 min         1/4" slices 4-5 min
1/4" slices = 3-4 min         Baby cut = 4-5 min


I hope you enjoy this recipe as much as we did!


print recipe

Shepherd's Pie - Pressure Cook Pot in Pot
An traditional Irish layered casserole of ground beef, veggies & gravy, topped with buttery garlicky mashed potatoes and cheese, is sure to be a winner! Make is all in one pot to save time and clean up.
*This recipe makes 6-8 generous servings and can be cut in half, keeping the same cook time.
Ingredients
  • 4 slices of bacon, cut up
  • 1 Tablespoon of cooking oil
  • 2 cups of onions, chopped (about 2 medium onions)
  • 1/2 teaspoon of salt
  • 1 teaspoon of granulated sugar
  • 1 pound lean ground beef, thawed
  • 1 teaspoon rosemary, finely chopped (1/4 teaspoon dried)
  • 1/2 teaspoon freshly ground black pepper
  • 1/2 teaspoon salt (this is not a typo)
  • 2 cloves garlic, peeled, pressed or minced
  • 1 (12 oz) bottle of beer, root beer, or beef broth
  • 1/2 cup beef broth 
  • 1 cup carrots, diced (about 2-3 medium carrots)
  • 3/4 cup frozen peas
  • 2 Tablespoons tomato paste
  • 1 Tablespoon all purpose flour + 1 Tablespoon softened butter, used after cooking
  • Mashed Garlicky Potatoes
  • 1.5 pounds russet potatoes, cut into 1/2" slices (about 4 large)
  • 10 whole garlic cloves, peeled
  • 1/2 cup sour cream or plain yogurt
  • 1/4 cup chicken broth
  • 4 Tablespoons butter, softened 
  • 1/2 teaspoon salt
  • 1/4 teaspoon freshly ground black pepper
  • 1/2 cup grated Cheddar, Swiss or combo
  • 1 Tablespoon parsley
Instructions
1. Using the Saute medium setting, cook your bacon, stirring occasionally, until they are brown. Remove the bacon with a slotted spoon and transfer to a plate layered with a paper towel.2. Add the cooking oil, onions, and 1/2 teaspoon of salt & cook, stirring until are soft. Sprinkle granulated sugar over the onions and cook for about 3 minutes, or until they begin to caramelize.3. Add ground beef, and cook until it begins to turn brown.4. Add the rosemary, salt, pepper, and garlic, stirring until they are fragrant, about 1 minute.5. Deglaze: Turn the cooker off and slowly add your thin liquid (beer, soda, or broth) to the pot, scraping the bottom to loosen any food stuck to the pot.6. Add reserved bacon, carrots, peas, and stir.7. Place the tomato paste on top & DO NOT stir. 8. Place a steamer basket on top of the meat. 9. Put the cut potatoes & whole garlic cloves in the steamer basket. 10. Put the pressure cooker lid on, in locking position and close the steam release valve. 11. Select HIGH pressure for 8 minutes, according to your model. 12. When cook time has finished, open the steam release valve for a quick release. 13. When the float pin has dropped, open the pressure cooker lid, remove the potatoes and place them in a separate bowl and cover.14. Mix together the 1 Tablespoon all purpose flour and butter and stir it into the meat mixture. Replace the lid on the cooker.15. Add sour cream, broth, butter, salt & pepper to the potatoes, and mash well. Remove the lid from the cooker, scoop the mashed potatoes onto the meat and spread them in an even layer. Sprinkle the top with shredded cheese and cover, for 2 minutes or until melted. Sprinkle with parsley and serve hot.

Details
Prep time: 15Cook time: 15Total time: 30 minutesYield: 6-8 servings
Related Posts Plugin for WordPress, Blogger...
Pin It button on image hover